Just got a new wireless or network printer for your home or office and need to install it on Windows 10? Compared to the old days, adding printers in Windows nowadays is usually a pretty easy process, as long as the printer isn’t ancient.
I’ve actually already talked about installing printers before, but my previous article was focused on manually adding a network printer using the IP address. That’s actually a last resort option in case you can’t get the printer installed automatically by Windows 10 first.
Before we get started, let’s talk about how to manage printers in Windows 10, because that has become a bit confusing. In Windows 10, you can add/remove/manage printers from the Control Panel or the Settings app.

Manage Printers in Windows 10

To get to the Control Panel printer manager, click on Devices and Printers. I still find this interface more familiar since it’s been around since Windows XP.

You’ll see a list of all your printers and other devices that may be on the network. The other way is to click on Start, then Settings and then click on Devices.

There’s really no reason for there to be two ways to do this, but that’s just how it is currently in Windows 10. You can pick either way and you’ll get all the same options, so it doesn’t really matter.

Adding a Printer in Windows 10

Now let’s get into the actual steps for adding a printer to Windows 10. In this article, we are assuming that you have connected your printer to either the wireless network or wired network. As long as your router is giving out IP addresses automatically using DHCP, getting your printer connected to the network should be straight-forward.
For wireless printers, just refer to the instructions on how to configure the printer with the wireless network settings. Most new wireless printers allow you to do this on the on-screen display of the printer, but some older wireless printers require you to connect the printer directly to a computer first, configure the wireless settings and then disconnect it.
Once the printer is connected, go ahead and click on Add a printer in the Devices and Printers dialog on your PC.

Now, if the printers are on and connected, magic should happen and any printers on the network not already added to your computer should appear in the list. If they do not show up, you should click on The printer that I want isn’t listed link at the bottom to troubleshoot. Go down to the Troubleshoot Installing Printers in Windows 10 section to read more about solving common problems.
If all is well, click on the printer you want to install and then click Next.

Windows will automatically setup the printer by installing the appropriate printer drivers onto the system. If available, it’ll download the drivers from the printer itself.

After a few seconds, the printer should be successfully added and you’ll be able to print a test page. Note that this procedure will be able to find wireless or wired printers on the network.

Troubleshoot Installing Printers in Windows 10

Now you probably wouldn’t be on this site if everything went so well as shown above, so let’s talk about some of the problems that can occur. Firstly, what if nothing shows up in the list of printers?
The first thing to do is click on that The printer that I want isn’t listed link. This will bring up the Find a Printer dialog.

You should start out with the first option (My printer is a little older. Help me find it.) as that will perform another scan, but with different methods to detect different kinds of printers.
If you’re in an office environment of some sort with a shared printer, you can go ahead and enter the full path to the printer, which you’ll need to get from your administrator. The Add a printer using a TCP/IP address or hostname option is basically the previous post I wrote about printers, which I linked to at the top of this article.
The last option, Add a local printer or network printer with manual settings, is basically if you have a printer that still uses a serial or parallel port. The Add a Bluetooth, wireless or network discoverable printer is the main dialog that comes up when you click on Add a Printer and it will just perform another normal scan.
If none of the options above work for you, it could be a problem with the printing system on your Windows 10 machine. The next option is to run the printer troubleshooter. You can click on Start, type in printer troubleshoot and then click on Find and Fix Printing Problems.

You can also download another printer troubleshooter from Microsoft and run that to see if it can fix any issues. Lastly, if you have an older printer that doesn’t have a Windows 10 driver, you might just have to upgrade to a new printer. You can always try to install a Windows 8 or Windows 7 driver, but it may not work because of higher security settings in Windows 10. If you have any questions, post a comment. Enjoy!
Here’s a quick little tip for anyone looking for a simple way to find out who is hosting a particular website. Trying to figure out who hosts a web site can be an annoying task if you’re trying to go through the usual channels by searching a WHOIS database, etc. A lot of times you’ll only get the company or person that registered the domain name, but not the actual hosting company.
Who is Hosting This? is a very simple web service whose sole purpose is to tell you the company that is hosting a website. I really like this because most of the other online web site checking tools simply do not give a clear and concise answer to this very simple question.

I came across this website because I was looking for a for better hosting company, but I first wanted to know what hosting companies some peer sites in my field were using, such as HowToGeek, Labnol.org, etc. I know those sites run smoothly and have millions of visitors every month, so if their servers can handle that traffic, I would be more inclined to go with one of those hosting companies.
Once you type in a domain name, for example, labnol.org, you’ll get your answer right away:

DreamHost is actually the hosting company for the Digital Inspiration website. I’ve tried it on a good number of sites and the results have been correct each time. Also, very large sites like Google.com, etc. will not give you any useful information because they have their own IP address ranges and use their own servers. You’ll also see this for other companies like CNET, etc because they manage all of their own hosting.

google hosting
In addition to websites like Google and Facebook, you may also run into smaller websites that use private registration or extra privacy settings at their hosting company. When a domain is private, the information is hidden from public view and you’ll only see information about the company that is being used to hide the registration or nothing at all, like in the example below:

no hosting company
This site does a pretty good job because you can sometimes tell the hosting company by looking at the Name Servers, but here they are simply using the domain name and not the name of the hosting website. Even if you click on the WHOIS link, everything is privately registered.
If you try to look up the IP address, you will have more luck. Once I did a WHOIS lookup on the IP address, I was able to determine the hosting company. You can also try another website like WebHostingHero. Their site was able to give me the correct info.

web host company
That’s about it! Overall, you should really run into very few issues when trying to determine the hosting company for a website. If you do, someone is really trying hard to hide his/her server from the public. If you have any questions, post a comment. Enjoy!
As I mentioned previously in an article comparing Windows 7 to Windows 8, the Task Manager has been completely redesigned. It’s now a lot simpler to use by default, but if you really want to get all the details like before, you can still get those! There are a couple of other little shortcuts and options that I found while playing around with Task Manage in Windows 8.
In this post, I’m going to go through just a few of the simple tricks/tips I learned and hopefully you’ll enjoy using the new Task Manager when you get a Windows 8 PC in a few weeks. If you have any tips of your own, feel free to post a comment.

Opening Task Manager in Windows 8

There are a couple of ways to get into the Task Manager in Windows 8 that are worth mentioning here.
1. You can press CTRL + SHIFT + ESC if you love keyboard shortcuts.
2. You can go to the Start Screen, then All apps and click on Task Manager.


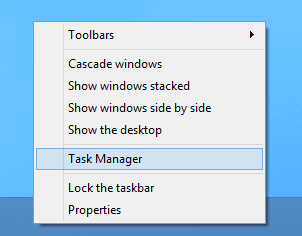
3. You can right-click on the Taskbar and click on Task Manager.


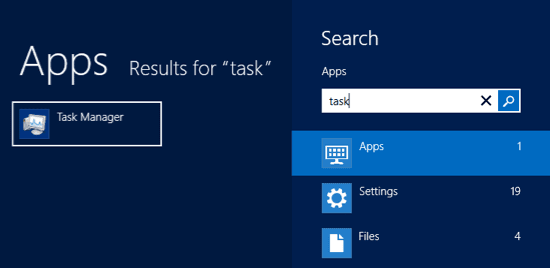
4. Press the Windows key to go to the Start Screen and then just start typing “Task…”


5. Press the Windows key + R and then type in taskmgr.exe.


6. Press CTRL + ALT + DELETE and then choose Task Manager.


That’s a lot of ways to access the Task Manager! Depending on how you use your computer, I’m sure one of those six will work for you.

Add Extra Columns

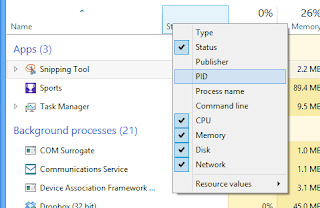
Every once in a while, I need to see extra information about a Windows process, such as the PID (process identifier). In Windows 8, you can just right-click on any header and add more columns by checking them.


See Logical Processors

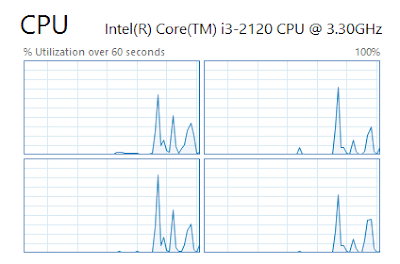
Nowadays a lot of consumer computers have more than one processor. If you have certain applications that can run on different processors and you want to check to make sure that the process load is actually being distributed, you can go to the Performance tab, click on CPU and then right-click and choose Change graph to and then choose Logical processors.


By default, the Task Manager will only show the overall CPU utilization. Now you can see the utilization for each logical processor on the system! Sweet.


Startup Impact

Task Manager in Windows 8 has a cool feature that lets you see the “impact” that a startup process has on the system. This is very helpful to quickly figure out which startup programs are slowing down the boot up process.


Update Speed

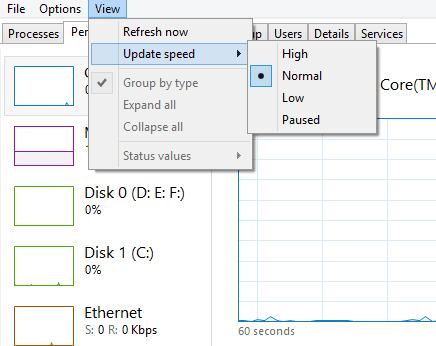
By default, the data you see in the performance tab only shows you the past 60 seconds. If you want to change that, you can click on View, Update Speed and choose from High, Normal or Low.


High will monitor over a 30-second time span and Low will monitor over a 4 minute time span. Low will also put less load on the machine when monitoring. The 4 minute time span is useful if you need to see the performance for any time frame longer than 60 seconds.

Network Stats

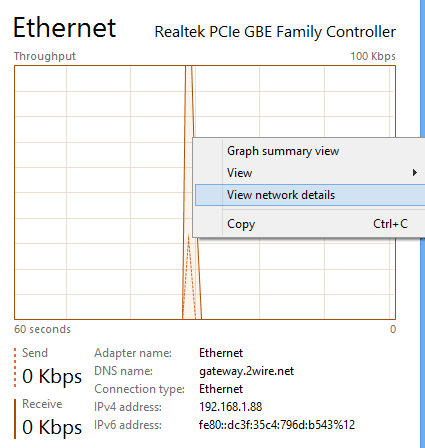
If you go to Network under Performance, you can right-click on the graph and choose View network details.


Here you can see detailed information about your network connection including link speed, network utilization, bytes sent, bytes received and lots more.


System UpTime

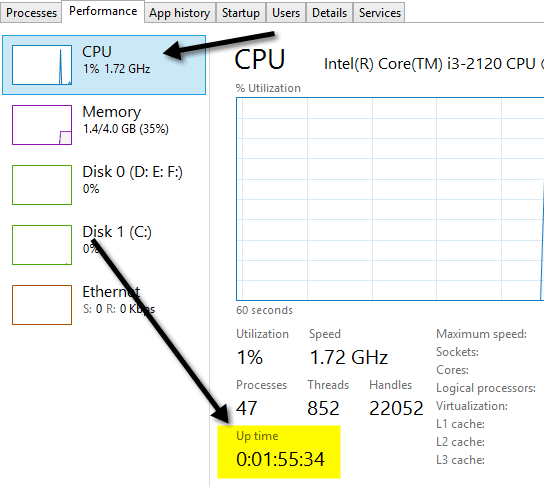
Thankfully, you don’t have to download a program to see the system uptime anymore in Windows. Just go to the Performance tab, click on CPU and you’ll see Up time down at the bottom:


Summary View

Another nice feature in the Task Manager is the summary view. Just right-click on any performance metric on the Performance tab and choose Summary view.


Now you get a nice little compact dialog box that you can move anywhere on your desktop or to another screen if you have dual monitors and monitor the performance while you run other apps and programs.


That’s about it! Windows 8 is definitely a nice upgrade from previous versions of Task Manager and hopefully this will give you a little more insight into how you can use it more efficiently. Enjoy!